


|
Thursday, January 29, 2015
Make Ahead Breakfast Sandwiches
Since our October Unprocessed experiment, we haven't been eating as much cereal. Actually, we eat very little cereal now, if any. I've settled into a nice pattern of making breakfasts for us on Sunday evenings that we will have for the following week, and it's working out very well for us. This week, I made breakfasts sandwiches and they were a big hit all around!
Monday, January 26, 2015
Slow Cooker Rabbit
Continuing my underappreciated meats theme here, let me tell you about the most delicious, tender rabbit dish we had last night. My stepson helped my uncle to process some rabbits over the weekend, and his payment was a whole rabbit. These rabbits are raised on a farm, so they don't have a gamey taste, which I'm told wild rabbit does. I will admit I've never had wild rabbit, so I don't exactly have a frame of reference here, but the rabbits we get from him are very tasty!
Ingredients:
1 whole rabbit
A few slices of bacon (I use bacon ends)
1 Onion, chopped
2 cloves garlic, minced
2 T rosemary
2 t tarragon
salt
Sunday, January 25, 2015
Dutch Oven Lamb Neck
I've always rooted for the underdog. Maybe that's why I look for under appreciated cuts of meat. So when I saw lamb neck slices available, I had to try them out. We're big fans of lamb around here, and I had a new cast iron dutch oven that I was itching to try out, so this would be perfect.

Ingredients
Lamb Neck Slices, generously salted
Olive Oil
1 pint chicken stock
4 carrots, sliced
1 onion, chopped
1 stalk celery, diced
3 cloves garlic, minced
2 T rosemary
2 t cumin
1/2 c red wine
1 pint diced tomatoes
1 c royal blend rice
salt and pepper to taste
Ingredients
Lamb Neck Slices, generously salted
Olive Oil
1 pint chicken stock
4 carrots, sliced
1 onion, chopped
1 stalk celery, diced
3 cloves garlic, minced
2 T rosemary
2 t cumin
1/2 c red wine
1 pint diced tomatoes
1 c royal blend rice
salt and pepper to taste
Thursday, January 8, 2015
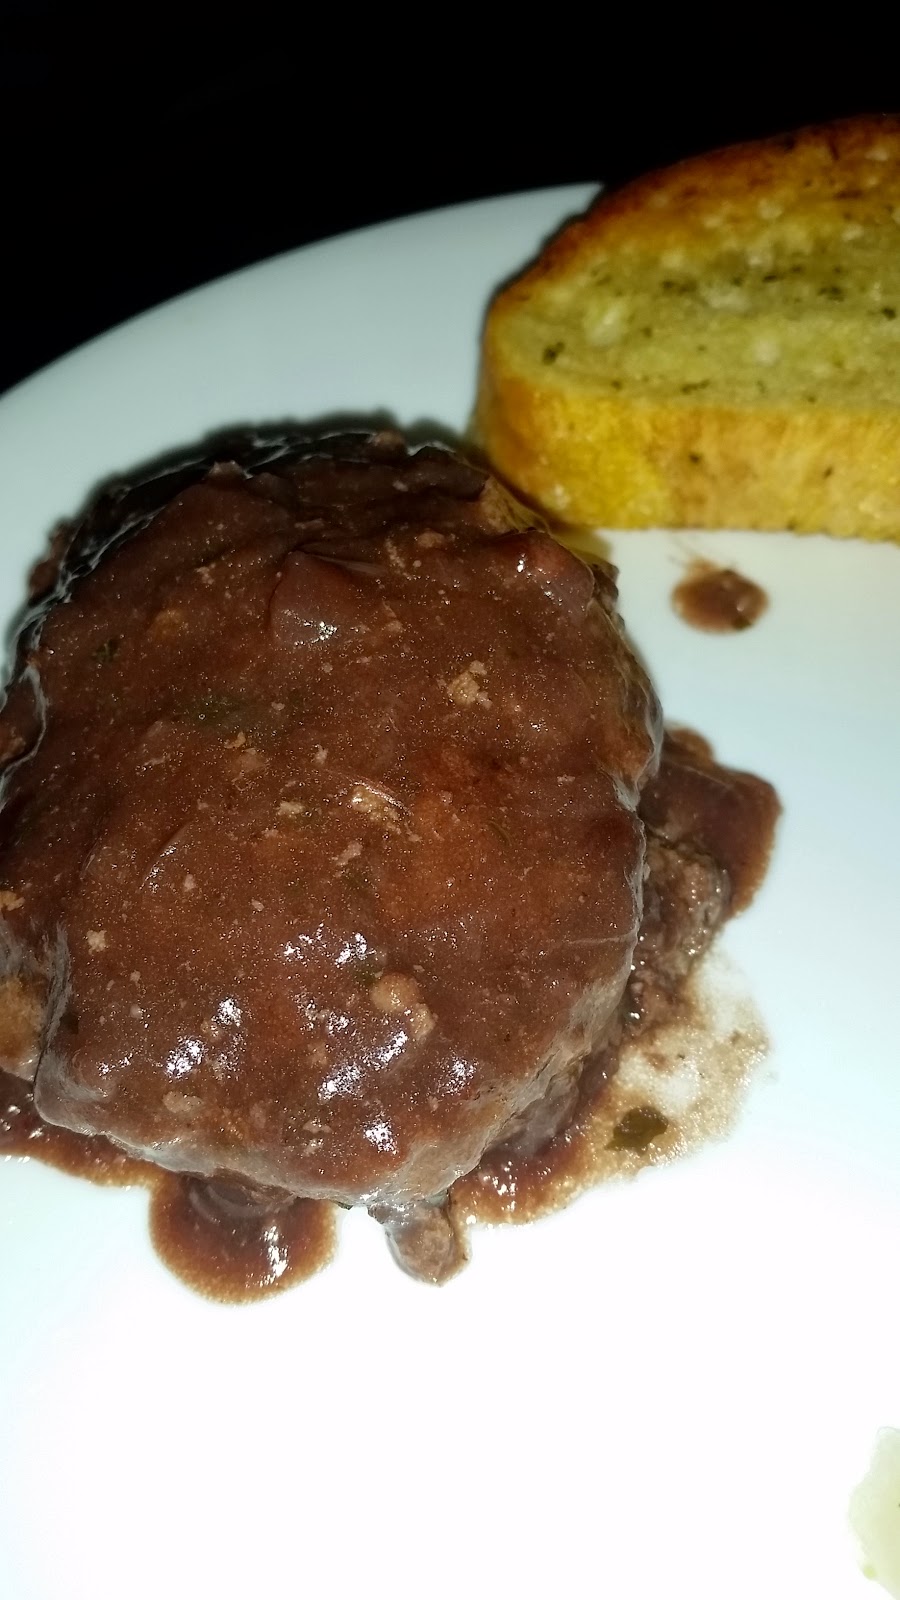
Salisbury Steak With Onion Gravy
Ok, so I know what you're thinking when I say Salisbury Steak. It's probably the mental image of the mystery meat you had in your elementary school cafeteria. Or maybe you are picturing some sort of frozen dinner with a meat like product. But let me assure you, this recipe is far from your childhood memories of bland, unidentifiable meat. It's time consuming to make the onion gravy, but it's all worth it!
It all starts with the onion gravy.
1 cup shredded or finely diced onions
2 Tablespoons butter
1/2 c red wine
2-3 c vegetable or beef stock
2 Tablespoons flour
salt and pepper
Melt the butter in the pan and add in the onions.

These will need to caramelize, so it's going to take a bit. Keep an eye on these and add in broth as needed to prevent onions from burning. While these are cooking, mix together the steaks.
1 1/2 lb lean ground beef
3 Tablespoons parsley
1/4 c diced onions
1 Tablespoon diced garlic
Salt and pepper
1/3 c Bread Crumbs
2 eggs
Mix everything except the bread crumbs and eggs together and let that sit for a few minutes so the flavors have a chance to set in.

Add in the bread crumbs and eggs, then form into steaks about 3/4" thick.

By this time, your onions should be carmelized, so it's time to add in the red wine. Simmer the wine and onions until it's reduced by half, and then whisk in the flour.

Let the flour cook into the wine and onions, then gradually whisk in more stock. By this time, the gravy should be starting to thicken. Finally-it's time to cook the beef!
Preheat a skillet on medium high and cook the steaks for 6 minutes, then flip and cook an additional 6 minutes. Remove steaks from pan and add them into the simmering gravy and cook 3-5 minutes longer. Don't mind the steamy pic below-I was having a rough time with the camera!

Remove from heat and allow the gravy to do its final thickening. The gravy should be a nice dark brown and should coat the back of a spoon. Salt and pepper as needed.

You'll have plenty of gravy in the pan, which will be perfect over mashed potatoes, egg noodles, or rice. Side note-that would have made a pretty picture too, but I didn't make it that far. I was lucky to get the bag of frozen steam fresh broccoli in the microwave and the box of garlic bread into the oven. Sigh....maybe another night I'll be able to pull off a perfect 50's style dinner.
It all starts with the onion gravy.
1 cup shredded or finely diced onions
2 Tablespoons butter
1/2 c red wine
2-3 c vegetable or beef stock
2 Tablespoons flour
salt and pepper
Melt the butter in the pan and add in the onions.
These will need to caramelize, so it's going to take a bit. Keep an eye on these and add in broth as needed to prevent onions from burning. While these are cooking, mix together the steaks.
1 1/2 lb lean ground beef
3 Tablespoons parsley
1/4 c diced onions
1 Tablespoon diced garlic
Salt and pepper
1/3 c Bread Crumbs
2 eggs
Mix everything except the bread crumbs and eggs together and let that sit for a few minutes so the flavors have a chance to set in.
Add in the bread crumbs and eggs, then form into steaks about 3/4" thick.
By this time, your onions should be carmelized, so it's time to add in the red wine. Simmer the wine and onions until it's reduced by half, and then whisk in the flour.
Let the flour cook into the wine and onions, then gradually whisk in more stock. By this time, the gravy should be starting to thicken. Finally-it's time to cook the beef!
Preheat a skillet on medium high and cook the steaks for 6 minutes, then flip and cook an additional 6 minutes. Remove steaks from pan and add them into the simmering gravy and cook 3-5 minutes longer. Don't mind the steamy pic below-I was having a rough time with the camera!
Remove from heat and allow the gravy to do its final thickening. The gravy should be a nice dark brown and should coat the back of a spoon. Salt and pepper as needed.
You'll have plenty of gravy in the pan, which will be perfect over mashed potatoes, egg noodles, or rice. Side note-that would have made a pretty picture too, but I didn't make it that far. I was lucky to get the bag of frozen steam fresh broccoli in the microwave and the box of garlic bread into the oven. Sigh....maybe another night I'll be able to pull off a perfect 50's style dinner.
Monday, November 17, 2014
Make Ahead Breakfast Bowls
After our October Unprocessed adventure, I haven't really gone back to cereal as a breakfast staple. I've been sticking to whole wheat muffins, and quite honestly, I was getting bored. I needed something different-and something with substance. Enter the breakfast bowl!

And the best part about these-you can make them ahead of time!
It does take some time to prepare, but it's well worth it early the next morning! Plan on about an hour and 15 minutes to cook and assemble.
Full recipe is at the bottom, but here's how I made these:
Start with potatoes. I used red and purple potatoes just to add some more color to breakfast.

While the potatoes are cooking, you can also cook and chop your bacon.

Then the eggs. Scrambled was the direction we took, but I'm sure other ways would work too.

Then top with a bit of cheese.

All that's left is to pop the lids on and into the refrigerator they go!

In the morning, I can grab one of these as I head out the door. I can heat it up at work and have a hot breakfast bowl ready to go.

Make Ahead Breakfast Bowls
Makes 9 bowls, but if you want to pack them full, then only about 6
Potatoes (enough to cover a large cookie sheet when cut into 1" cubes)
1 1/2 Tablespoons Olive Oil
1/2 teaspoon paprika
1 teaspoon minced garlic
salt
1 lb bacon
About a dozen eggs
1/2 c sharp cheddar cheese (or whatever cheese you like)
Start out by cutting potatoes into 1"(ish) cubes. Then toss them with some olive oil, paprika, garlic powder (or minced garlic), and salt. Spread them out on a cookie sheet and roast for about 45 minutes at 400 degrees, or until soft in the middle with crunchy exterior. Let cool just until they can be comfortably touched.
While the potatoes are cooking (or cooling), cook the bacon. I prefer to do this much bacon in the oven. 400 degrees for about 12 minutes is perfect for us, but you may want to cook it a bit longer if you want crunchy bacon. Drain on paper towel lined plate and chop into bite size pieces.
Last, cook the eggs. I used about 10 eggs, plus some more egg whites (maybe 4?). I had a few containers of egg whites in the freezer that I had put in there over the summer. I figured they really should be eaten soon, so defrosting those and mixing them in here seemed like a great way to use them up.
Then it's time to make the bowls. Start with potatoes, then bacon, then eggs, and top with about a tablespoon of cheese. I tried to make sure each bowl had an equal amount of each ingredient, and I knew I wanted 9 bowls, so I probably only had about a quarter cup of potatoes, 2 strips of bacon, and about an egg and a half in each bowl. But, if you want a bigger breakfast, I would only use 6 bowls. Refrigerate for up to 5 days-or freeze!
To reheat them in the morning, about 45 seconds is all it takes.
These would be really good with salsa, or goat cheese with chives, or I suppose some people would prefer sausage instead of bacon, but I was making these for 3 of us, and I didn't want to mess with figuring out which bowls were mine that early in the morning, so we all got the same.
These were so good, I even got a text from my 16 year old stepson telling me how good they were this morning!
It does take some time to prepare, but it's well worth it early the next morning! Plan on about an hour and 15 minutes to cook and assemble.
Full recipe is at the bottom, but here's how I made these:
Start with potatoes. I used red and purple potatoes just to add some more color to breakfast.
While the potatoes are cooking, you can also cook and chop your bacon.
Then the eggs. Scrambled was the direction we took, but I'm sure other ways would work too.
Then top with a bit of cheese.
All that's left is to pop the lids on and into the refrigerator they go!
In the morning, I can grab one of these as I head out the door. I can heat it up at work and have a hot breakfast bowl ready to go.
Make Ahead Breakfast Bowls
Makes 9 bowls, but if you want to pack them full, then only about 6
Potatoes (enough to cover a large cookie sheet when cut into 1" cubes)
1 1/2 Tablespoons Olive Oil
1/2 teaspoon paprika
1 teaspoon minced garlic
salt
1 lb bacon
About a dozen eggs
1/2 c sharp cheddar cheese (or whatever cheese you like)
Start out by cutting potatoes into 1"(ish) cubes. Then toss them with some olive oil, paprika, garlic powder (or minced garlic), and salt. Spread them out on a cookie sheet and roast for about 45 minutes at 400 degrees, or until soft in the middle with crunchy exterior. Let cool just until they can be comfortably touched.
While the potatoes are cooking (or cooling), cook the bacon. I prefer to do this much bacon in the oven. 400 degrees for about 12 minutes is perfect for us, but you may want to cook it a bit longer if you want crunchy bacon. Drain on paper towel lined plate and chop into bite size pieces.
Last, cook the eggs. I used about 10 eggs, plus some more egg whites (maybe 4?). I had a few containers of egg whites in the freezer that I had put in there over the summer. I figured they really should be eaten soon, so defrosting those and mixing them in here seemed like a great way to use them up.
Then it's time to make the bowls. Start with potatoes, then bacon, then eggs, and top with about a tablespoon of cheese. I tried to make sure each bowl had an equal amount of each ingredient, and I knew I wanted 9 bowls, so I probably only had about a quarter cup of potatoes, 2 strips of bacon, and about an egg and a half in each bowl. But, if you want a bigger breakfast, I would only use 6 bowls. Refrigerate for up to 5 days-or freeze!
To reheat them in the morning, about 45 seconds is all it takes.
These would be really good with salsa, or goat cheese with chives, or I suppose some people would prefer sausage instead of bacon, but I was making these for 3 of us, and I didn't want to mess with figuring out which bowls were mine that early in the morning, so we all got the same.
These were so good, I even got a text from my 16 year old stepson telling me how good they were this morning!
Friday, November 14, 2014
Canning Stock
It seems like this time of year, I'm going through cans and cans of stock. I love making my own, but it takes up so much room in the freezer. So this year, I finally decided to can my own. I don't know why I've never canned it before, but I'm so glad I did this year!
My stock always varies a bit depending on what I have available, but it always starts out the same:
Onions
Carrots
Celery
Garlic
Salt and Pepper
Bay Leaves
Parsley (if I have it fresh)
From there, I can make veggie stock, or I can add chicken, turkey, or beef bones to make stock. I add enough water to cover the veggies and bones, cover and let it simmer.

I usually let the stock simmer for at least 6 hours to make sure I get all the good stuff out of the bones. Then, strain the stock and pour into hot jars, leaving 1 inch head space. Process at 10 lbs for 25 minutes for quarts or 20 minutes for pints.

If I have a jar that doesn't seal, I just pour it out into a container and toss it in the freezer.

I think I ended up doing about 50 jars in the last couple of weeks. It sounds like a lot, but with homemade noodles, soups, and couscous, we go through quite a bit of it.
My stock always varies a bit depending on what I have available, but it always starts out the same:
Onions
Carrots
Celery
Garlic
Salt and Pepper
Bay Leaves
Parsley (if I have it fresh)
From there, I can make veggie stock, or I can add chicken, turkey, or beef bones to make stock. I add enough water to cover the veggies and bones, cover and let it simmer.
I usually let the stock simmer for at least 6 hours to make sure I get all the good stuff out of the bones. Then, strain the stock and pour into hot jars, leaving 1 inch head space. Process at 10 lbs for 25 minutes for quarts or 20 minutes for pints.
If I have a jar that doesn't seal, I just pour it out into a container and toss it in the freezer.
I think I ended up doing about 50 jars in the last couple of weeks. It sounds like a lot, but with homemade noodles, soups, and couscous, we go through quite a bit of it.
Friday, October 31, 2014
Pumpkin Chocolate Swirl Muffins
I was flipping through recipes last night trying to find a decent unprocessed recipe for pumpkin muffins. I couldn't really find anything that sounded all that great, so I decided to take a regular recipe and alter it to fit my needs. I had no idea these muffins would turn out as good as they were! I didn't take pictures along the way, so you'll have to settle for looking at these gorgeous muffins in their finished state.

Ingredients:
4 eggs
1 c sorghum syrup
1 c honey (or agave nectar)
2 c pumpkin
1 1/4 c applesauce
3 c whole wheat flour
2 t baking soda
2 t baking powder
1 t cinnamon
1/2 t pumpkin pie spice
1 t salt
1/3 c cocoa
1/4 c chocolate chips (I used this recipe)
Mix eggs, sorghum, honey, pumpkin, and applesauce in a large bowl. In another bowl, mix flour, baking soda, baking powder, cinnamon, pumpkin pie spice and salt. Gradually mix dry ingredients into wet ingredients until fully incorporated, then add the chocolate chips. Remove about 1/4 of the batter into a small bowl and add the cocoa. You can adjust the cocoa to taste.
Scoop pumpkin batter into muffin tins. Fill each cup about half way. Then add a spoonful of the cocoa/pumpkin batter on top of each. Using a knife, gently swirl the cocoa batter around without mixing it in.
Bake at 400 for 12-15 minutes.
This made about 30 muffins for us. I seriously could have eaten all 30 of them!
Subscribe to:
Posts (Atom)