Pages

Showing posts with label eat local. Show all posts

Monday, October 19, 2015

Raised Trench Carrot Harvest

Last year we grew the most delicious carrots. The problem was we left more carrots in the ground than we actually brought up. I don't know what the secret is to digging up carrots without breaking them and never did figure it out. This year, I knew we wanted to have our own carrots again, but we had to figure out a better way to harvest them. After thinking about it, we came up with the idea to build boxes that would act as raised trenches. Oxymoron, I know. But that was the best term I could think of to describe what we were doing.

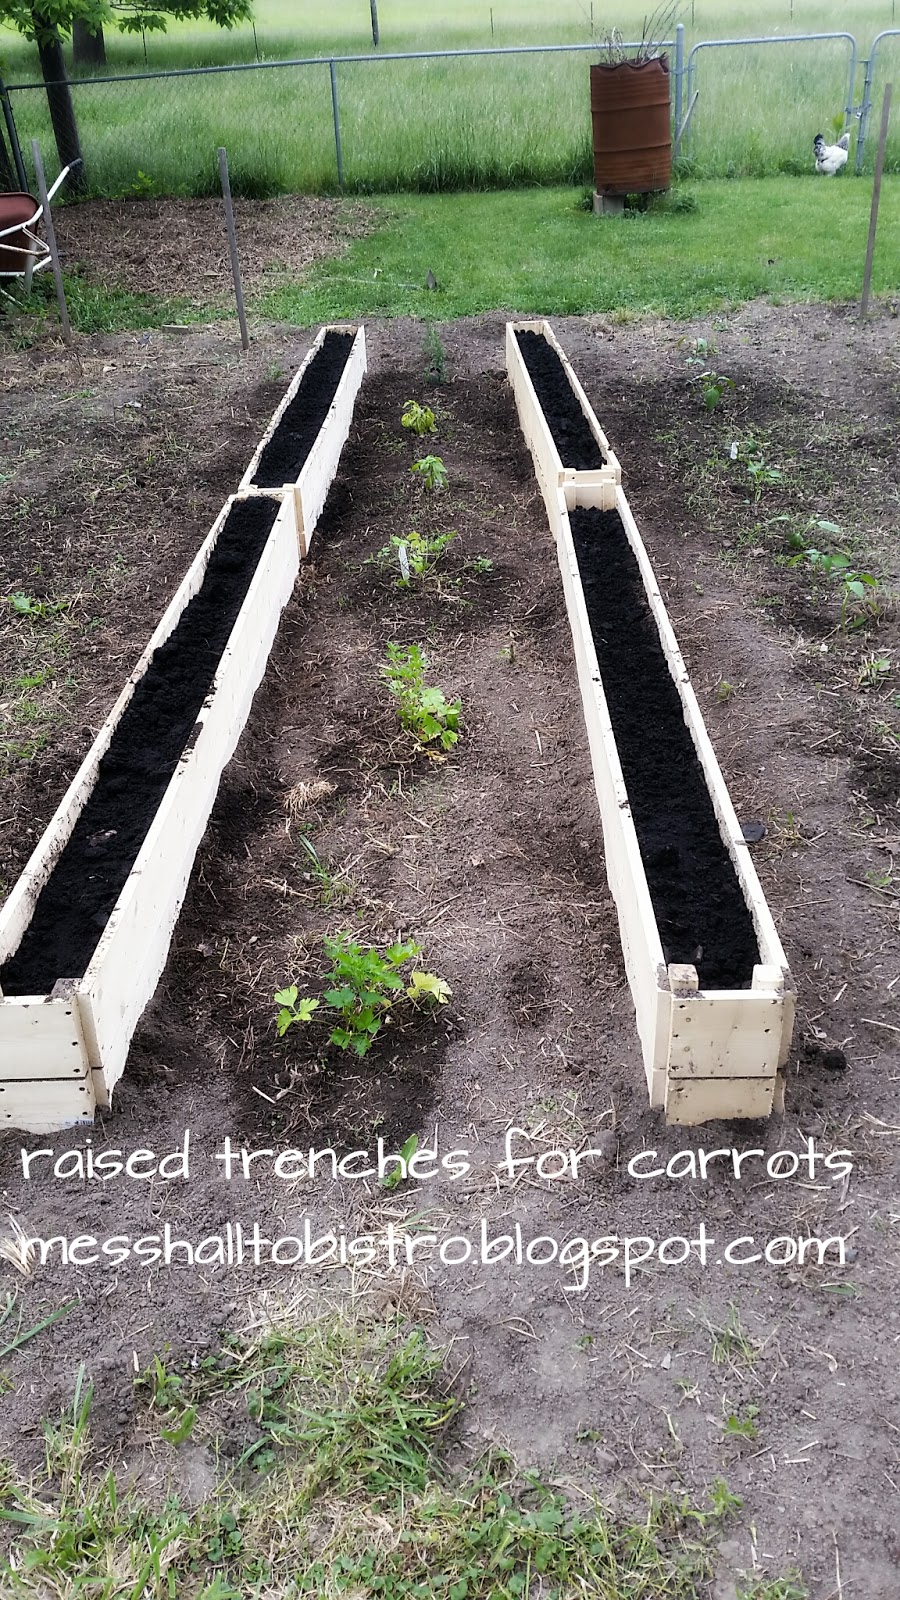
We stared by building boxes out of 1x6's, adding square supports in the corners. Each board is attached with screws so we can easily take the boxes apart at harvest. We used untreated wood knowing the boxes would probably only last a year or two.


Before placing them in the garden, we dug out a trench about 3 inches deep so the boxes would be partially below ground level. Then we filled them up with dirt and planted the carrot seeds.


Then we patiently wait all summer while everything else grows and the carrots take their time. I'd like to saw we did an excellent job pulling weeds and all that maintenance stuff, but it didn't happen. At some point during the late summer, we realized that the critters (rabbits maybe?) got into the garden, which is completely fenced in with chicken wire. They found one row of carrots and completely devoured all the plants. Yep, an entire row of carrots-gone. They had got into the second row, but not all the way. I don't know what stopped them, but I was glad we were going to have a least a few carrots. Fast forward to mid October and the looming first frost. It's time to harvest the carrots!

I sent the husband out to take the screws off the corners. Don't mind the massively overgrown weeds all around. 

After the top board was removed, we could start to see some decent looking carrots.

After removing the bottom board, we just pushed the rest of the box backward so it was easy to move the dirt away and grab the carrots.


After a quick rinse and trim, we ended up with a decent amount of carrots. Next year, I'm thinking about adding chicken wire over the top of the boxes so the critters can't get in there and dig up the veggies!

Friday, September 4, 2015

Fried Cupcake Squash

As much as I love all things fall, it's always disappointing to see the end of the gardening season. We still have a few things left, so we're savoring them as long as possible! Since the cupcake squash were a new addition this year, we're still looking for different ways to fix them. The other night as I was staring at them, I wondered if they could be fried like zucchini. I mean if you can fry oreos, Pepsi, green beans, and butter, why not cupcake squash?

While the oil was heating in my cast iron pan, I set up my assembly line of frying essentials.


First is the flour. I used whole wheat and seasoned it with Italian seasoning and salt. Next, a couple of eggs--scrambled. The last bowl is breadcrumbs. I used a mixture of panko and some of my random frozen bread crumbs. (Whenever we have bread or crackers that start go to stale, I run them through the food processor and add it to the bag in the freezer. Currently, there is a mixture of whole wheat rolls, rye bread, and multigrain crackers.)

And I cut up the squash. I sliced it, then cut the slices into quarters just to make the frying process easier.

When the oil was about 325 degrees, I dropped the coated pieces in. I used my smallest cast iron pan for this because I like to work in small batches and I think it keeps the oil at a more consistent temperature. About 3 minutes per side was perfect for these.


After each side gets a nice golden color, set them on the rack and add some finishing salt.


The cupcake squash really have two very distinct phases. When we first pick them, the seeds are still very soft and more like zucchini. But as they ripen, the seeds and the inner flesh become more like typical fall squash. The late/ripened squash are much better suited to scooping out the seeds before cooking. Fried cupcake squash really needs to be made with the earlier squash where the flesh and seeds are still very tender and juicy.

Monday, August 24, 2015

Roasted Cupcake Squash and Brussels Sprouts

It's been a crazy gardening season. It started out so much cooler than usual, which wreaked havoc on all the plants that thrive in warmer weather. Then it rained. And rained. I'm fairly certain I saw Noah go by. Then it finally remembered it was summer and warm weather came. The zucchini did great. We have been eating zucchini daily for about 2 months and I was able to freeze a lot too. The corn didn't fare as well. All of the rain completely flooded out the green beans-not a single plant survived. And because of the super soaked soil, the weeds took over nearly everything else. The one bring spot was the cupcake squash. I was concerned at first because when the cooler weather decided to stick around for a few weeks, we only had male flowers-no fruit. But soon, we had so many I couldn't keep up with them.

If you haven't seen cupcake squash yet, here's what they look like.


They're about the size of an onion and taste similar to zucchini, but with a nutty taste. And like zucchini, if you don't pick them on a regular basis, they will grow to amazingly large size! We had a few that were missed and ended up about the size of my head! We like to add them to salads raw, but my favorite way to eat them is roasted.

Roasted Cupcake Squash and Brussels Sprouts

Preheat oven to 400 degrees. On a baking sheet, toss together brussels sprouts (cut in half, long ways), sliced squash, olive oil and salt. I used olive oil infused with Italian seasoning and garlic.


Roast until veggies are tender, about 30-45 minutes, stirring around about half way through.

When veggies turn a light golden brown, they're ready. Finish off with some pepper.


I like the squash by itself, but pairing with brussels sprouts is the best combination! They hold up really well to roasting, much better than other summer squash, but still have a delicate taste. We're just about to the end of this growing season, so I don't have too many more of these left. They will absolutely make it into next year's garden.

Thursday, August 13, 2015

Chicken Parm with Zoodles

Anyone else have mountains of zucchini that seem to multiply daily? Even eating zucchini on a daily basis doesn't seem to make a dent in the amount we have! And really, after eating it daily for 5 or 6 weeks, you have to figure out some new ways to cook it. We've been using zucchini in place of pasta for spaghetti and lasagna, but last night we decided to try making Chicken Parmesan with the zoodles. One word.....yum! It was such a great combination! 


For the chicken.....

Chicken breast, cut into thin pieces (about a pound)
1 c bread crumbs
1 egg
1/4 c Parmesan cheese
2 T Italian seasoning
Salt
Flour

Preheat a large skillet on about medium heat and add just enough olive oil to coat the bottom of the pan.
In a large ziploc bag, mix bread crumbs, cheese, Italian seasoning and salt. Dust chicken with flour, dip in egg, then toss into bag until chicken is coated. Pan fry until chicken is cooked through, then place in an oven to keep warm. Just before serving, top with additional cheese and put back in the oven until it melts.

For the sauce....

2 c tomato sauce
1 onion, diced
4 teaspoons minced garlic
2 T Italian seasoning
Salt and pepper to taste

Saute the garlic and onion until soft in a medium pan with some olive oil. Stir in tomato sauce, Italian seasoning, salt and pepper. Keep on low until ready to serve, stirring occasionally.

For the zoodles....

4 medium zucchini
2 T butter
1/4 c Parmesan cheese

Using a vegetable spiralizer, cut the zucchini into long strips.


Cook by either sauteing in a pan or by boiling for 2-3 minutes. Drain and stir in butter and cheese.

Now all that's left is to assemble your plate and enjoy! Now to figure out what to do with the  rest of the zucchini mountain.....

Thursday, May 14, 2015

Getting Ready for the Next Batch of Chicks

After our first incubator hatch, we had lots of young chicks living in our basement for a few weeks. It was still a little chilly outside, so they weren't quite ready for the early spring temperatures until April. But we were finally able to move them outside into our grow out pen so they could get used to the big chickens and the big chickens could get used to seeing them around.


After a couple of weeks, we were able to let them out to explore the entire yard.


It didn't take long for each group to check the others out.

Within a couple of days, the two groups became one flock.


Maybe it was seeing the young chicks around the yard, but of course we now have 2 broody hens sitting on a total of 45 eggs! The first group should be hatching this weekend.


Most of our birds are dual purpose breeds, so with this sudden influx of birds, we will likely raise the roosters as freezer fillers and some of our older hens will join them later on this summer. We will also select the hens we want to keep for their specific traits-best layers, temperament, and markings.

Monday, April 13, 2015

Vanilla Frozen Custard

We had our foray into ducks last year. I did not like it to say the least. They were dirty and smelly. The only perk to having ducks was cooking them for dinner! Thankfully, there are many people who enjoy having ducks on their farms and (even better) sometimes they share their excess eggs with me. Yay! That was exactly what happened to me recently. To get an idea of how big these are, they are sitting in a "jumbo" egg carton and it wouldn't close.


Tuesday, March 17, 2015

Lemon Garlic Rainbow Chard

Last week I bought some rainbow chard from the food hub. It was absolutely beautiful! I love the bright colors and so desperately needed it after this cold rainy weather we've been having. I had some salmon patties ready to cook for dinner the other night and I knew that was the perfect time to pull out the chard. I love the flavor of chard and it's soooo easy to make!

Start out by sauteing the chopped stems with some olive oil, a tablespoon or two of garlic, a few dashes of red pepper flakes and some salt.


After about three minutes, add in the roughly chopped leaves and toss around with tongs until the leaves wilt. There's nothing dainty and pretty about my pan of chard, but if I had company over, I'd make it a little more pretty and fork friendly! Splash on some lemon juice (maybe a tablespoon) and you're ready to go!


The lemon and garlic flavors were perfect with the salmon patties and some steamed broccoli and cauliflower.