Pages

Friday, January 29, 2016

Roasted Turnip Homefries

Comfort foods are awesome. I know, that's why they're called comfort foods, right? But seriously, sometimes some deep fried potatoes with seasoned salt is all you can think about. And that's rough when you're trying to watch what you eat. So we have to get creative. And sometimes lie to the ones we feed so they aren't aware that they're raving about how much they love the homefries and keep asking what I did differently. But then we eventually tell them that it's actually turnips, not potatoes, that they love so much and we watch their very, very confused faces.

And in all fairness to the spud, potatoes are not the worst choice we can make in the kitchen. But if you're counting carbs, turnips fair a bit better, with nearly a 1/3 of the carbs of white potatoes. 


Making turnip homefries is fairly simple. Peel and cut the turnips just like you would potatoes, then sautee (in butter of course) with seasonings such as seasoned salt and garlic, tossing in some diced green onions at the end. To get them extra crispy, spread the cooked homefries on a baking sheet and roast for another 10-15 minutes in a 375-400 degree oven, stirring about half way through. You won't regret it, and if you don't tell them, no one will know!! 


Monday, January 25, 2016

Root Vegetable Noodles with Oven Roasted Chicken

Unless you are still one of the carb loving, noddle eating, gluten devouring folks out there (that I secretly despise and am constantly envious of), then you may have run across or even tried one of the gadgets that makes "noodles" out of vegetables. The "Veggetti" is one of my favorites. It's easy to grab it and turn zucchini into noodles in a matter of seconds. But in my experience, it is kind of limited to zucchini and yellow squash. And even those need to be fairly small or you end up pulverizing the vegetables (and your hands). Even Alton Brown has something to say about it.


So I've been on the search for something a little more versatile. Especially since we officially gave up pasta this month. (Although we haven't eaten any in almost a year) I finally found one and ordered it.


It was a bit tricky to figure out at first. I'm not going to lie....the Veggetti was fairly self explanatory, but this required some actual thought. But once we figured it out, we had noodles made out of turnips, carrots and parsnips in a matter of just a couple of minutes.


Don't mind my messy counters. I wasn't exactly planning on sharing the video with everyone-just wanted to send it to a couple of people to let them know that this one actually works!


While my husband was creating the noodles, I had put the chicken in the oven and started sauteing some onions and garlic in a couple tablespoons of butter on the stove. The noodles were added to the onions and garlic and cooked until tender, but not mushy.


A little bit of sliced chicken breast, Parmesan cheese, some salt and pepper and dinner was ready! Leave the cheese off to make it Paleo friendly, or keep it there and it's Primal friendly. Either way, it was very tasty and filling! 


Recipe:
1 Medium turnip
1 Medium parsnip
2 Medium Carrots
1 onion (diced)
2 cloves garlic (minced)
Roasted chicken (or rotisserie chicken if you're in a hurry)
(Optional) Parmesan cheese

Saute onion and garlic on low heat until fragrant. Toss in spiralized vegetables and cook on low until desired tenderness. Top with chicken and sprinkle cheese on top.


Note: The above links will take you to the products advertised. If you buy it, I may receive monetary compensation for the referral, however I did not receive any compensation (monetary or otherwise) for this post. 

Monday, January 4, 2016

Spaghetti Squash Breakfast Bake


So a few weeks ago while I was at the doctor's office, it was suggested to me that my normal breakfast (banana, 1 Tbsp nut butter, and a whole wheat wrap) was too carb heavy and I should switch to 2 eggs and citrus fruit instead. *note: the nutrition facts below were created at http://www.caloriecount.com/. I am making the assumption they are correct and haven't bothered to double check their numbers. 

Current breakfast

Proposed breakfast

While I didn't necessarily agree with their proposed breakfast, I tried. I really did. But it turns out eating citrus every day seemed to aggravate my stomach. A lot.

So I set out to find a different breakfast that was lower in carbs, but didn't bother my stomach. And if I could add in some nutrients, that'd be cool too. So for the first try, I wanted to keep the eggs as they suggested, but add in some veggies, and I didn't want to have to make it every day. So I came up with a breakfast bake I could make over the weekend, portion out, then freeze for a grab and go breakfast.

New breakfast


It was pretty easy to make over the weekend. I roasted a medium spaghetti squash in the oven (400 degrees for about 45 minutes), sauteed the tomatoes and peppers, chopped the kale and green onions, cooked the bacon (then chopped it), and then grabbed a big bowl to mix it all together, along with the shredded cheese and some salt and pepper. Why only 3 pieces of bacon? Well, it's all I had. And to be honest, I don't think I would have noticed if it wasn't there. But I did sautee the peppers and tomatoes in the bacon grease so.....


Then spread that out into an 8x8 pan and pour over 7 beaten eggs. 


Bake at 375 for 20 minutes, then drop the heat down to 350 and continue baking until eggs are set, which was about another 10 minutes for me. That gets cut into 9 pieces and frozen. To reheat, cover and microwave on about 50% power for a minute or two.

If I kept it at 2 eggs per day, that would be 18 eggs and I'd probably need a bigger pan to bake it in, but here's what the nutrition would look like:

Wednesday, November 18, 2015

Cheesy Chicken and Kale

Sometimes Pinterest is my Google. Seriously, I often feel like my phone should come with an option to say "OK, Pinterest....show me recipes using chicken, kale, garlic and cheese." And yesterday was one of those times. I was trying to decide what to fix for dinner, so I just typed in the ingredients I wanted to use and behold...all of these great recipes came up!


One immediately caught my eye. It's probably because I could see all the cheesy goodness. I used her recipe as a starting point for dinner. It sounded so good and I figured I could make some changes to suit our tastes, and switch out the pasta for spaghetti squash, Ugh, giving up pasta is hard.

What you'll need:

2 lbs chicken breast, cut into bite size pieces
1 large spaghetti squash
1 medium onion, diced
2 Tablespoons minced garlic
2 Tablespoons Italian seasoning
1 c chicken stock
1-2 Tablespoons butter
1-2 Tablespoons flour (equal amounts of butter and flour)
5 ounces baby kale, cut into manageable pieces
2 c Italian blend shredded cheese
Milk
Salt, pepper, red pepper flakes to taste

So I started by getting the spaghetti squash in the oven. I used a rather large one knowing I was feeding 2 teenage boys and my husband as well. I generally cook for 8 so we have plenty for dinner and for lunch the next day. After the spaghetti squash had been in the oven for about 30 minutes, I started in on the rest of the ingredients. First-saute onions in some olive oil.


After about 5 minutes, I added in some garlic and let that simmer for another few minutes. Then the chicken and herbs.


I let that go until the chicken was no longer pink on the outside. By this time, the spaghetti squash was done, so I pulled it out of the oven so it could cool enough for me to touch it.


Back to the chicken....
Push all the meat to one side of the pan and drop in a tablespoon or two of butter and let it melt, then whisk in an equal amount of flour and let that cook until it stiffens up. Add in about a cup of chicken stock and mix everything together in the pan. Keeping a simmer going, add in the kale and the cheese. After a couple of minutes, the sauce will start to thicken. Add milk until it's nice and creamy. Then add in the spaghetti squash and make a mess all over the stove top as you stir it all together. A final seasoning with salt, pepper and some red pepper flakes and it's ready to go.

I was going to add in some spinach too at this point, but I decided since we were having a salad with it and there was spinach in the salad, that was probably enough. Next time I make this, I'm going to toss in some capers though. The brininess would be perfect in here! But even without the capers, dinner was a hit with everyone. There was just enough left for the husband and I to have lunch today.


Monday, November 16, 2015

DIY Outdoor Christmas Tree Decorations

I managed to make it half way though November before the Christmas decorations came out. That's some sort of record for me. Because the husband and I are both still kids when it comes to Christmas, we have to set a limit on how many decorations we buy each year, and that includes lights. This year, he opted to buy a few of the inflatable outdoor decorations, and we had to retire a couple, so it really didn't feel like we added anything this year. While we were out shopping this weekend, we saw some outdoor decorations for sale that I knew we could make ourselves. The decorations were basically tomato cages turned upside down, then donned with tinsel, lights and some decorations. They were $9.99 each, which wasn't a bad price, but I knew we could make some with items we already had around the house, which essentially makes them free. I can do free!


I grabbed three tomato cages from the garage. We had a few that have been through many garden seasons and were starting to fall apart, literally. I figured these would be perfect for this because I don't have to undo it all to use them again in the spring. But, with just a few snips, they could be ready to go for garden use if we needed to.

Mine were a bit mangled, so I started by straightening them as much as I could, then flipped it upside down and tied the top together with zip ties. Have I mentioned I love zip ties? I think half of our house/garage/chicken coops/fencing is held together with zip ties.

Next, add the lights and tinsel, wrapping around the "trees", securing with zip ties along the way. Then add your ornaments and a tree topper. We used star ornaments as the tree toppers.


All that's left is to trip the zip ties. They look like something out of a Dr. Seuss book at this point, but that's ok. Once they are outside and turned on, no one will notice. 


The last step is to take them out and plug them in!


Friday, November 13, 2015

Lightened Up Casserole

One of my favorite comfort foods is chicken and broccoli casserole. It doesn't matter what time of year it is or what the temperature is outside, that's the one meal that always hits the spot for me. And the best part is it's made from leftovers.

Last night I was trying to figure out what to make with the leftover turkey breast I had, it came to me that I could fairly easily tweak the chicken and broccoli casserole recipe to make it work with the turkey, and lighten it up in the process. Today I entered the ingredients into the Recipe Calculator to see what the nutritional difference was between the original recipe and the new version. The amounts may be slightly different, but for the quick comparison, it will do. Here's the original recipe:


And the Nutrition Information

For this version, here are the swaps I made: 
1 roasted turkey breast for the chicken
1 egg beaten in place of the mayo
1 roasted spaghetti squash in place of the rice
3 slices of cheddar cheese in place of the colby jack
1/2 c riced and roasted cauliflower in place of the breadcrumbs

Check out the new nutrition information: 

These swaps cut out over 100 calories, 16 g of fat and 20 carbs per serving!! That's not to mention all of the increased vitamins and minerals!


Monday, October 19, 2015

Raised Trench Carrot Harvest

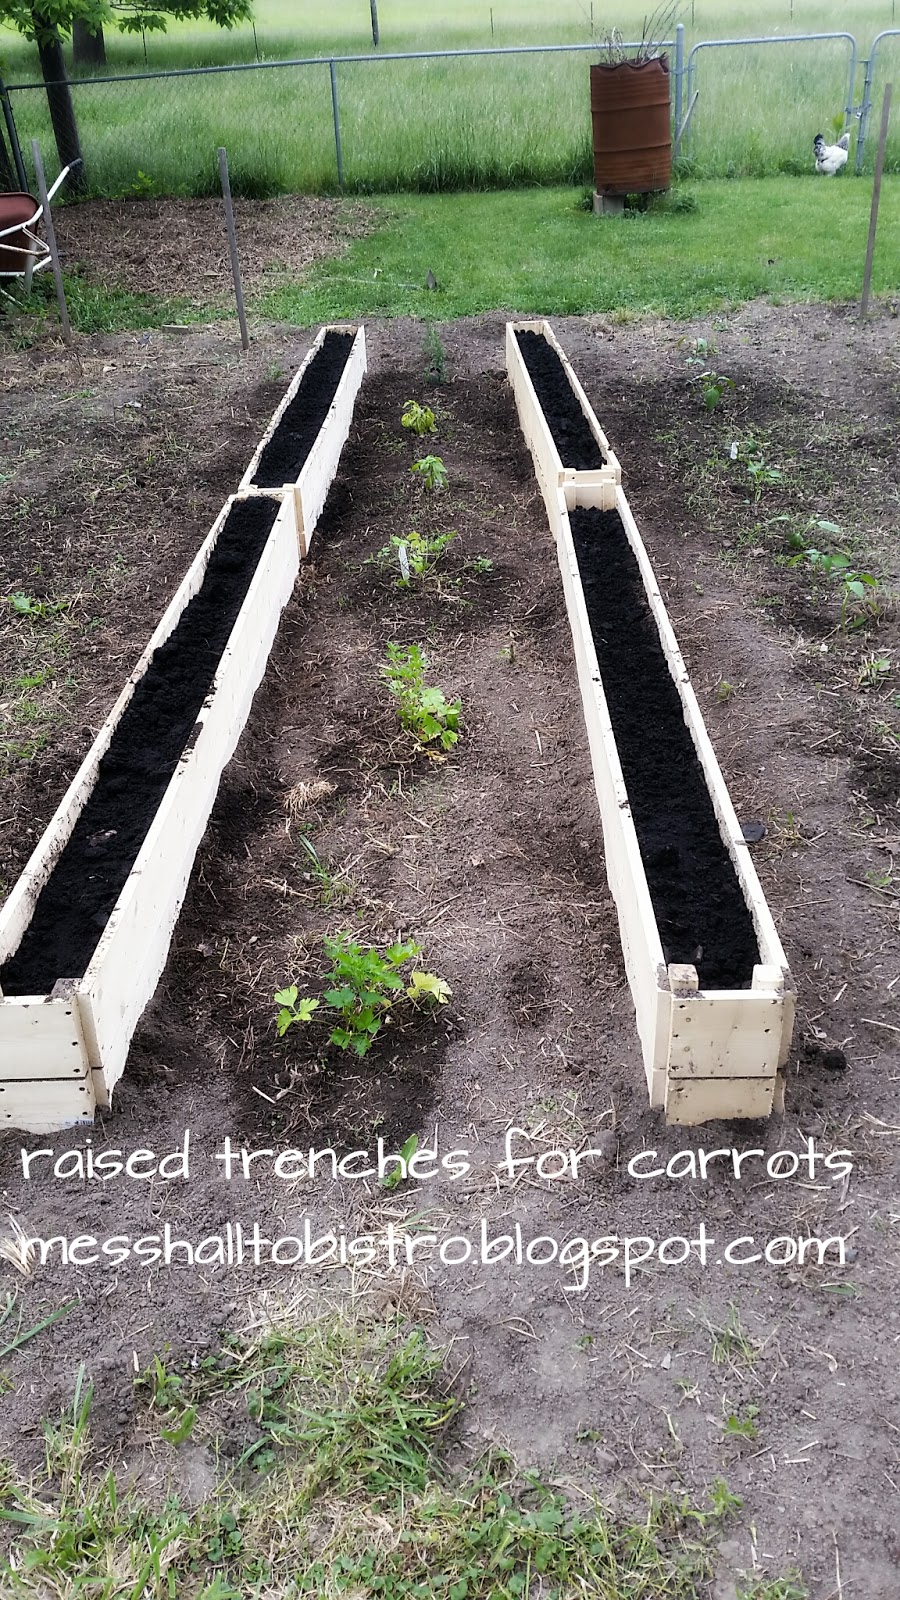
Last year we grew the most delicious carrots. The problem was we left more carrots in the ground than we actually brought up. I don't know what the secret is to digging up carrots without breaking them and never did figure it out. This year, I knew we wanted to have our own carrots again, but we had to figure out a better way to harvest them. After thinking about it, we came up with the idea to build boxes that would act as raised trenches. Oxymoron, I know. But that was the best term I could think of to describe what we were doing.

We stared by building boxes out of 1x6's, adding square supports in the corners. Each board is attached with screws so we can easily take the boxes apart at harvest. We used untreated wood knowing the boxes would probably only last a year or two.


Before placing them in the garden, we dug out a trench about 3 inches deep so the boxes would be partially below ground level. Then we filled them up with dirt and planted the carrot seeds.


Then we patiently wait all summer while everything else grows and the carrots take their time. I'd like to saw we did an excellent job pulling weeds and all that maintenance stuff, but it didn't happen. At some point during the late summer, we realized that the critters (rabbits maybe?) got into the garden, which is completely fenced in with chicken wire. They found one row of carrots and completely devoured all the plants. Yep, an entire row of carrots-gone. They had got into the second row, but not all the way. I don't know what stopped them, but I was glad we were going to have a least a few carrots. Fast forward to mid October and the looming first frost. It's time to harvest the carrots!

I sent the husband out to take the screws off the corners. Don't mind the massively overgrown weeds all around. 

After the top board was removed, we could start to see some decent looking carrots.

After removing the bottom board, we just pushed the rest of the box backward so it was easy to move the dirt away and grab the carrots.


After a quick rinse and trim, we ended up with a decent amount of carrots. Next year, I'm thinking about adding chicken wire over the top of the boxes so the critters can't get in there and dig up the veggies!