Pages

Tuesday, July 27, 2010

Blackberry Pie

My awesome neighbor surprised me today with a bowl full of blackberries! Oh, so many choices! What should I make??? Well, I have plenty of jams that I've already canned, and several pounds of berries in the freezer, so pie it is!!

Photobucket

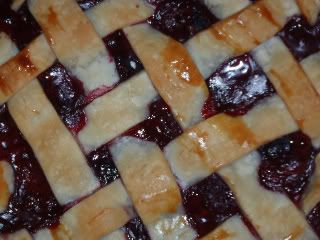
I'm not a big fan of fruit pies. Mostly because I'm not a fan of pie crust. Weird, right? I know. I've never been accused of having normal tastes! That being said, I decided to try a lattice top. Please excuse how poorly it turned out! It was my first try, and I let Thing 4 help me with it. Yeah, we'll blame it on the kid. Sounds good to me! And since I don't really make fruit pies very often, I don't have a good recipe...just some guidance from my gut.

You'll need:
2 pie crusts (I cheat...Pillsbury does a great job making refrigerated pie crusts)
Berries to fill the pie
A few tablespoons of sugar
A little bit of flour
A few pats of butter
1 egg, or a bit of milk to brush on top of the pie

Place first pie crust on bottom of pie plate and push all the way down...but don't smash it into the pan!
In large bowl, carefully mix berries with a few tablespoons of sugar and a little bit of flour or cornstarch to thicken it up. Fill pie.
Add a few pats of butter to the top.
Either place second pie crust on top, or cut into strips and weave onto top.
Using a pastry brush, lightly brush the top shell with either an egg well beaten, or a bit of milk.

Bake at 425 for 15 minutes, then at 375 for 40 minutes.

Photobucket


Allow to cool completely. Cut and serve!

Find Other Great Recipes At These Places Where I Linked Up This Post!
Tempt my Tummy Tuesday
Tasty Tuesday
Tuesday at the Table
LittleYayas

Sunday, July 25, 2010

Watermelon Basket

Did you know July is National Watermelon Month? And August is Watermelon Month in Indiana? In observance of those, I made a watermelon basket filled with other local fruits. Making a watermelon basket is super easy. Similar to carving a pumpkin, but easier!

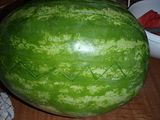
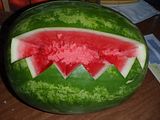
To begin, find a large watermelon with a semi-flat bottom. Then mark where your "handle" will be on the top, and the edges around the middle. I used a jagged pattern, but the possibilities are endless.
Photobucket

Cut along the edges and remove cutouts.
Photobucket

Scrape out melon and set aside.


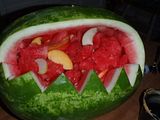
Trim and necessary areas and fill with various fruits. Don't forget to put your watermelon pieces back in!!!

Photobucket

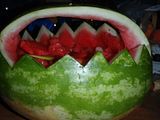
If you're making it for later, set filled watermelon in freezer until about 2 hours before you use it.

Photobucket

Friday, July 23, 2010

What's for Dinner? #4


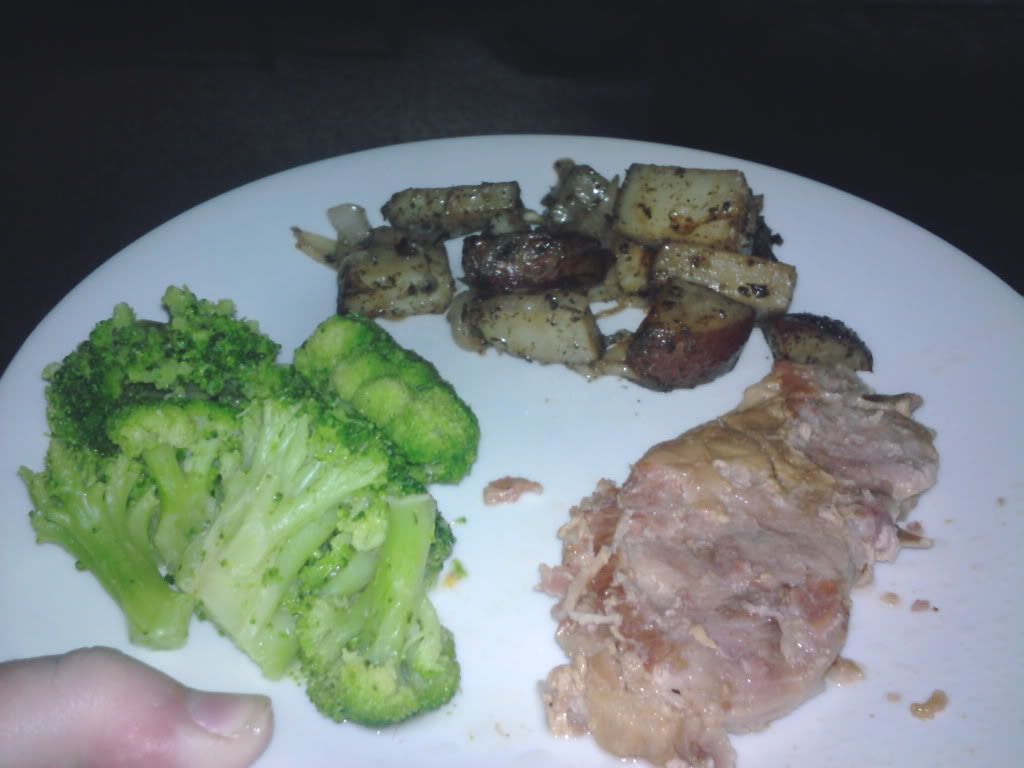
Peach tenderloin, rosemary potatoes, broccoli


For the tenderloin:

Pork Tenderloin
Sm can of peaches (in their own juice)
Brandy

Preheat oven to 275. In 11x13 pan, lay out tenderloin. If it's not a split loin, make an incision (about 1" deep) down the middle of the loin. Pour 1/4 c brandy into slit. Pour can of peaches around tenderloin. Cover tightly with aluminum foil. Bake 2 1/2 - 4 hours, until cooked throughout and tender.  Serve by the slice.


For potatoes

Red potatoes (one and a half for each person, plus one extra for every 3 people)
Olive oil
Rosemary
Salt
Garlic (optional)


Wash and cut potatoes into quarters (or smaller if they're medium to large in size). In large skillet, pour about 1 tablespoon olive oil in pan and heat on medium. When oil is hot, add potatoes. Sprinkle rosemary, garlic and salt to taste on potatoes and let cook until brown on bottom. Stir potatoes and turn to cook other side. If potatoes stick, add olive oil, teaspoon at a time. When they are fully cooked, turn out onto paper towel lined plate to blot any excess oil.


Broccoli

Cook as desired--steam, microwave or boil


Combine all for a fantastic meal!

Wednesday, July 21, 2010

Guest Blog: Cakes

Ever wonder where all of my creative ideas started? You may remember my mom from one of the first posts on Messhall to Bistro. She taught me all the basics in the kitchen, and is the reason I can keep all the bellies full and happy in my house now. I can also blame her for my lack of measuring skills. She taught me how to get the feel for recipes, and use my senses rather than mathematics to cook. So without further ado, meet the Mom.

Beyond dinners and brunches, she also does cakes. Meet Bobbi, a "forever 29" baker, quilter, and mom.


I've always like to cook and bake. I used to sit and watch my grandma as long as she'd let me be in the same room.She was my mentor and inspiration to be a better cook and baker. Through the years, I've broadened my horizons a bit...at least in the kitchen! These are some of my recent efforts.


Like what you see? Bobbi is located in East Central Indiana and can be reached at AnotherBobbiCreation@gmail.com.

This post was linked to Spotlight Yourself Wednesday


House of Hepworths
Smart and Trendy Moms

Monday, July 19, 2010

What's for Dinner #3

Easy, Cheesy Quesadillas


These are super easy, and sooo tasty!

You'll Need:

Flour tortillas
Fully cooked chicken, cut up in pieces
Salsa
Shredded Cheese

To begin, put one tortilla on a plate and sprinkle shredded cheese on. Don't get it too close to the edges, or you'll end up with a mess. I use 1-2 tablespoons of cheese. Then I add two heaping tablespoons of salsa. Next, evenly distribute pieces of chicken. Put second tortilla on top and move to Quesadilla cooker (Or, onto skillet).


Brown evenly on both sides if using skillet method, or cook until light turns green on quesadilla maker. Let cool a couple of minutes, then cut into wedges. Oh, and don't pay attention to the little pieces of my quesadilla maker on my counter...I keep telling myself I'm going to get a new one, yet I end up rigging it up each time!

I love to make this because you can please everyone with it. You can put just about anything inside them. This is one of our "go-to" dinners when we have leftover chicken, which was the case tonight. The kids in our house prefer just chicken and cheese, so this is a perfect way to make them a dinner they'll eat and a dinner we'll also love. Here are some other variations we've done:

Turkey, bacon, cheese
Chicken, bacon, cheese
Sauteed onions and peppers, chicken, cheese (aka fajita quesadillas)

We haven't really found a combination we haven't liked!

The Girl Creative

Please visit
Skip to My Lou for Made by You Mondays
Tempt My Tummy Tuesday
Tasty Tuesday Parade of Food
Tuesdays at the Table

Saturday, July 17, 2010

Ziploc Baggie Omelettes

***DISCLAIMER-ZIPLOC SAYS NOT TO DO THIS BECAUSE OF UNKNOWN CHEMICALS RELEASED WHILE BOILING THEIR BAGS. I'M NOT CLAIMING THIS IS SAFE.***

This is from the Ziploc website
"Can I boil in Ziploc® Brand Bags?
No. Ziploc® Brand Bags are not designed to withstand the extreme heat of boiling."

That being said upfront, I make them anyway. Do with this information what you will...


Here's the easy way to make an omelet with no fuss


First, get a pot of water on the stove and boil. You'll want to have it about half way full of water. Then, get your omelet goodies ready to go. We used bacon


Then in a small bowl, scramble up your eggs. Plan for about 3 eggs per baggie.


Pour into one quart size ziploc freezer baggies. Add in other goodies of your choice (sausage, onions, tomatoes, bacon, etc) and a little bit of cheese.


Place in boiling water for 5 minutes.


When it's done, it will slide right out of the bag and on to the plate!


A couple of cautions with this:

Ziploc does NOT recommend doing this!
Make sure you use freezer bags.
Make sure the entire bottom of the bag is INSIDE the pot and make sure the top of the bag doesn't fold over and touch the outside of the pan. IT WILL MELT THE BAG!

Thursday, July 15, 2010

As Promised, a New Post

As part of my love of summer, I had my first weekend of canning last weekend. We now have pickles and salsa!! Dill pickles are a favorite around our house.


So how can you improve on something the kids already like? Make it yourself (with a few helpers, of course)!

We start by picking cucumbers from the garden. Explaining to my husband that we want to pick them before they get seeds the size of a small child is still something we're working on, but we'll get there. Then we wash the veggies and slice, or cut into spears. Before we load the jars up, we put a grape leaf in the bottom of the jar. That's a TOP SECRET tip I learned from a CI to keep the pickles crunchy. Then we load the jar up, until it's about an inch from the top, with cucumbers. Next, add sliced onions, diced fresh garlic, and dill. Make sure to really get all those ingredients down into the jar, not on top of the cucumbers. Last year I used dried dill courtesy of Watkins spices, but this year I grew my own and used fresh. While all of this is going on, I boil a mixture of vinegar and water on the stove. I would never do more than a 50/50 ratio on this. I actually prefer about one part vinegar to 3 parts water. And of course some canning salt. Pour the boiling liquid over the cucumbers and can as normal.


The next item on the canning to-do list is salsa. I canned, and canned, and canned last year and all of that only got us through September! So I vowed this year to make so much salsa I never wanted to see the stuff again. This is basically the same thing I made in my earlier post, but adapted for canning. A word of caution with salsa, make sure you follow directions! Because of this, I'm not going to post my recipe, but rather link you up to some good resources.


Pick Your Own.Org is a great resource for all your farm fresh needs. And best of all, all of their canning recipes are verified by USDA to make sure your home canning experience does not include a trip to the hospital because of botulism. Another resource is the The National Center for Home Food Preservation. Basically the big deal with salsa is tomatoes are a low acid food, therefor on the border when it comes to canning. I always, always add lemon juice to my salsa to up the acidity.

Canning was something I took up last year and will probably continue to do for years to come. Hopefully, you'll give it a try and never have to wonder where your salsa came from. Stay tuned for jellies, and a couple months down the road, applesauce and apple butter!

Smart and Trendy Moms
badge

Wednesday, July 14, 2010

Everyone likes Awards....

So I feel a little bad because I've been kind of lazy in the last few days and haven't posted anything. And that's mainly because I haven't cooked anything! That being said, I have an award that I received from a couple of my fellow bloggers and I need to pass it along because that's what the cool kids do, right??


I received this from Amy, so make sure you pour yourself a cup of coffee and head on over to check out her blog! You never know if it's going to be pictures of her garden, a great recipe, or just a heart warming story on life.

I also received this from Cris over at GOODEness Gracious. I admire her commitment to blogging. I don't know how she has time to run her own business, be a mommy, AND blog. I get exhausted just thinking about it!

The Rules:

*Thank the blogger who awarded it to you.
*Sum up your blogging philosophy, motivation, and experience using five (5) words.
*Pass it on to 10 other blogs which you feel have real substance.
5 words: Cooking amazing dishes made simple

1. This blog cracks me up! Anyone with kids, or sense of humor, will love this!
2. So anyone with kids will really appreciate Ma, What's for Dinner?. I stop by all the time to see what great things I can snag off her site and make my four step kids think I'm just the most creative chef in the world.
3. This next one is great. After reading the post about being a step-mom, I was hooked. There's all kinds of great reading at The Mom-tage.
4. Thought on Life and Dirty Diapers is great. Make sure to check out her creative and budget minded post about the party decorations.
5. As far as linky parties go, Tempt My Tummy Tuesday rules! If you haven't already checked out it, go....NOW!
6. I'm new to Autumn's Blog, but she had me hooked at "bacon".
7. An Extraordinary Ordinary Life is another must read.
8. Are you noticing a theme yet? Cooking is kind of my "thing" and Hon, What's for Dinner? is one I stumbled upon Tuesday at Tempt My Tummy Tuesday
9. Chew on Dirt is (one of my) boss's blogs. To clarify, I have several supervisors, and this blog belongs to one of them. If the conservation world has you confused, this is the place to go.
10. Because in the bloggie world, you just click from page to page, I ended up at Mom on Dealz and a great post on school supply prices at different stores. And let me tell you, buying school supplies for one may not be bad, but it can really add up when buying for 4...so a shout out and a big THANK YOU!!

I promise I will start cooking again soon and get some new posts up. Until then, please visit some of my favorites listed above, as well as the two lovely ladies who gave me this award.

Friday, July 9, 2010

What's for Dinner? #2

So I've spent the last hour reading the greatest blog EVER and it has inspired me to post my birthday dinner Shannon made for me. Yes my friends, you read that right. My husband actually cooked me dinner.


I have a confession on the above photo...I had actually taken a couple bites before I thought to document the one night he cooked!

Alfredo So Easy A Caveman (or Husband) Can Do It

Ingredients:
Fettuccine pasta
Pre-cooked, frozen chicken chunks
Frozen Broccoli
Alfredo Sauce (Ragu is my favorite)

Bring water to boil and cook pasta until tender (you'd think this would be a "duh" step, but I had to tell him how to do it)
In large skillet, put frozen chicken chunks and enough water to cover the bottom of the pan on medium heat until heated throughout
In microwave, heat up broccoli

Drain and combine all

Pour Alfredo sauce in bottom of pan and add pasta, chicken, and broccoli and warm over low heat, stirring often, until all ingredients are well coated with sauce and warm throughout.

So thank you, Shannon, for an awesome dinner! And all of you thought he was only good for changing your oil, spark plugs, transmission, etc.

Wednesday, July 7, 2010

Cookies and Salsa

I'm going to claim this as a "Jennifer Original", but if it's been done before, I apologize! It wouldn't be the first time I thought I was a genius, only to find out it had been done before. See my brookies/crownies. But here goes!

To start out, you need to make your "chips". I use lace cookies, which are traditionally a Christmas cookie. I've seen many versions of these, but I suggest this one.


Now for the salsa! The best part about this is you can make it any way you want it. This started out as a way to use up all the berries I received from my friends with berry patches. Indiana strawberries are probably one of my all time favorite foods. They're not as big as the California berries you generally see at the store, but they are so sweet and delicious. Combine those with some blueberries, raspberries and mangoes, and you have a fantastic fruity salsa.

I went to the Mooresville farmer's market today, but to my dismay, not one single piece of fruit. Fortunately, I still had some friends with some unused berries and Marsh supplied the rest for me. I went all out this time and used strawberries, blueberries, blackberries, raspberries, plums, mangoes, tangerines, apricots, and nectarines. I'll warn you now, this part is very time consuming. You'll need to cut all the fruit up into tiny pieces. This is very important! Otherwise, you just end up with fruit salad and the juices don't mix together the same way salsa does.

Once you have your cookies and salsa ready, it's time to eat! But wait! There's more!

Feeling extra creative today??
When you take your warm cookies off the parchment paper, drape them over the handle of a wooden spoon to cool. Once they're cool, carefully remove them from the handle and you're left with a "taco"!


Maybe you're a taco salad type of person...lay the warm cookie over a glass bowl turned upside down. Now you have your "bowl" for the shell and you can fill it with salsa to make your salad.


Or, you can make all of them and have a fruity fiesta!


You may have noticed the new button on the right. If you haven't already, check out Simply Sweet Home for lots of great reading.

Monday, July 5, 2010

Three Sun Burned Faces, A Little Chocolate, and A Lot of Love

After a very busy 4th of July weekend, we went to the pool today with our good friend, Audrey. We had a fun filled afternoon of swimming and splashing. Afterward, we were all pooped! A quick rest was in store, but not for long!


My husband wanted something sweet after dinner, so we all whipped up a quick batch of brownies. This recipe may look suspiciously similar to the Nestle Tollhouse recipe, and that's because it is! We use their recipe from the back of the cocoa box and add our touches that make it extra special.


1 2/3 c sugar
3/4 c melted Crisco butter flavored baking sticks
2 T coffee (we use the leftovers from this morning's batch)
2 eggs
1 1/2 t vanilla extract
1/2 t mint flavoring
1 1/3 c flour
3/4 c cocoa
1/2 t baking powder
1/4 t salt


Preheat oven to 350. Mix sugar, crisco and coffee in large bowl. Stir in eggs, vanilla and mint. In separate bowl, mix all remaining ingredients. Slowly mix dry ingredients into wet mixture and mix until well blended. Spread into greased 13 x 9 pan and bake 18-22 minutes.

And what does the kitchen look like after the husband has got a hold of it??


This post was linked to Tempt My Tummy Tuesday and Tuesdays at the Table. Be sure to check them out and all the delicious recipes everyone has to share

Thursday, July 1, 2010

What's for Dinner? #1

I hear three words more than any others in my house.

"Jen, I'm huuuunnnggryy"

There is a great need for a "whiny" font.

But I digress. Here's a dinner we had this week that everyone loved.


To start with, I made an applewood smoked bacon wrapped tenderloin. It may sound complicated, but Sam's Club sells them preseasoned. And this is one of the easiest things to cook. There are many ways to cook them, but here's how I did this one:

Preheat oven to 275
Line 11 x 13 baking dish with foil
Place entire loin in dish and cover with foil
Bake 4-6 hours, or until fully cooked and tender

If you don't get a preseasoned loin, follow the same instructions above, but add half a stick of butter, one onion sliced, and season to taste (rosemary and some Mrs Dash are my choices).

In our house, pork comes with one of two things; Green Box Pasta (aka the Rice a Roni in the green box) or mashed potatoes. We went with taters this week. Mashed potatoes are pretty standard, but I usually try to mix things up a little bit by adding sour cream, chives, ranch dressing, cheddar cheese, or something like that.

Now, on to the veggies. With four kids, it's impossible to find a vegetable they will all eat, so we do offer a choice of fruit in place of the veggie du jour. This week we had cheesy broccoli. I make cheesy broccoli by cooking my broccoli (steam over boiling water until tender) then adding cheese soup and a few dashes of salt. The fruit option was apples that night, but that just means more broccoli for the rest of us!

When cooking a large tenderloin, there are always leftovers. This is one of the best things to have left over because you can make a completely different meal with it.

Take your leftovers and shred with a fork. Put the shredded pork in the crockpot with your favorite bbq sauce and let simmer on low heat until hot throughout. Serve on hamburger buns.

Stay tuned for more delicious dinners from our table to yours!