Pages

Thursday, September 30, 2010

I Heart Fall, and Some Catching Up

Through a tearful goodbye to Summer, I welcome Fall with arms wide open!


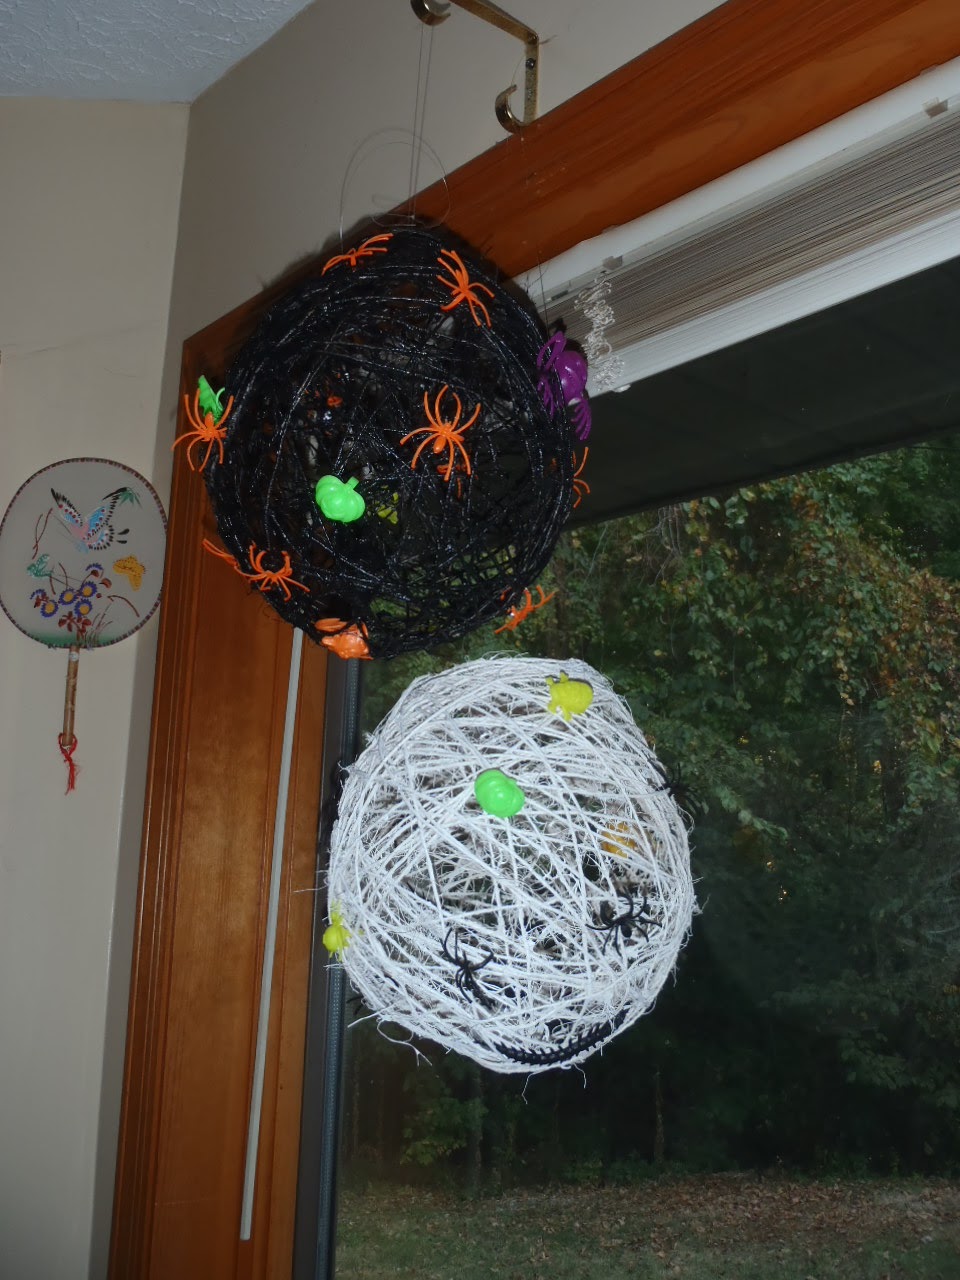
There are a few things I really love about Fall. Last week, I showed everyone the fun crafts I had been working on. I'll share a secret. I do them by myself first to see if the kids are going to like it or be able to do it. Over the weekend, the kids did their twine balls. Let me tell you, three kids + glue + balloons = fun, messy times! I wish I had gotten a few pics of the process, but you'll have to settle for the end result!


We also made a scarecrow. This is something I've wanted to do with them for a long time, but for one reason or another, we never did. I've never seen 3 kids have so much fun stuffing an old pair of pants and a sweatshirt with straw! The kids couldn't decide on a face, so we picked up a mask at the dollar store. Then we took all the leftover straw a made a big pile on the porch. It was such a fun afternoon!


The oddest part about this is the neighbor's dog. He is terrified of it! Sunday morning, he stood about 10 feet away and barked...and barked....and barked. I swear I saw my dog chuckling at him.


Here's an oldie but goodie. Who doesn't like ghost suckers? And how easy they are!
Tissues
Ribbon
Marker
Sucker (the big ones, like Tootsie Pops or Blow Pops)

Place middle of tissue over sucker. Twist once and tie with ribbon. Add face. Done! Thing 4 and I made up a whole bunch of these. Sometimes, it's the littlest things that amuse them!


Another great thing about fall is the cooking. It seems like that's kind of our jump start to the holiday season. Almost a "warm up" for Thanksgiving and Christmas.

I made some Caramel Apple Jam (recipe to come later) which really got me hooked on a caramel kick. So what do you do??? Make Caramel Popcorn!!


Now, for the catch up segment...
Have you seen this blog? Mama.Mommy.Mom is a girl after my own heart. You'll find recipes, great photos, and witty observations about the world around us. Make sure you check it out! Anywho...she gave me this bloggy award, and now it's my turn to pass it on!

Here are the rules:

1. Accept the award. Post in on your blog with the name of the person who has granted the award and his or her blog link.
2. Pay it forward to 5 other bloggers that you have newly discovered.
3. Contact those blog owners and let them know they've been chosen.
Voila!
So, I will be passing on a Lovely Blog Award to:

I hope you all check them out. These are just a handful of the great blogs out there.

Wednesday, September 29, 2010

Farewell, Summer

Dear Summer,
 I've enjoyed your company so much this year.

We made a lot of special memories.

Started some new traditions

And revisited some of our favorite outdoor activities


I have enjoyed our time together, but it is with a heavy heart that I bid you farewell.  I will miss you until we meet again next year. 


This post was linked to:

Tuesday, September 28, 2010

Apple Pie Pork Loin?

Ott, A and I had so much fun during Canning Week, we didn't want the fun to stop! Every Tuesday, we'll be showing off recipes using great things we canned. Make sure to stop by Ott,A's blog to see what she's been up to!

Two things you should know about me, and have probably picked up on by now. We love pork...and apples! I started to make a pork loin the other day and cook it in some apples. To the pantry to I go! I grabbed a jar of what I thought was just canned apples and popped it open. That's when I realized my mistake. I had grabbed a jar of apple pie filling!!! Well, it IS apple, and I already had it open, so why not? 


I also added some Mrs. Dash in the red cap. I'm not really sure which variety that is. We go by color. As I normally do with a pork loin, I baked it at 250 for about 7 hours. 

I didn't tell the husband about the mistake. I just let him eat it. And much to my surprise, the cinnamon, nutmeg and other spices married quite well with the pork and Mrs. Dash! Even the husband commented on how much better it was this time than the last time I baked a pork loin in apples. I don't know that I will make it like this every time, but it certainly was good for a mistake!

Check out the great blogs below who also enjoy being creative with food they can!

Tuesday, September 21, 2010

Cheesy Bacon Meatloaf

I hate meatloaf. Let me just get that out there now. I've had many, many people tell me how much I'll like "their" meatloaf. But no. I really just don't like meatloaf. Of course, the kids and the husband all love it. I think the problem is that I detest ketchup. I'm not much of a condiment person. Although sometimes, you have to give it to what everyone else wants. I decided to make a compromise. That's when the Cheesy Bacon Meatloaf was born.

What you'll need:

1 lb ground beef (lean)
3/4 c cheese, shredded
6 pieces of bacon, cooked and crumbled
2 eggs
1/4 c onion, diced finely
salt and pepper

Preheat oven to 350.
Dice the onion and shred the cheese


Cook the bacon and chop finely, or crumble

Mix cheese, bacon, eggs, ground beef, and onion in a large bowl. Add a few shakes of salt and pepper. Mix well and press into loaf pan.


Bake for 40 minutes, or until no longer pink. 

No meatloaf is complete without mashed potatoes!


The first time I made this, I added breadcrumbs as you normally would with meatloaf. The second time, I just totally spaced it. The meatloaf stayed together just fine. It was a little crumbly when we cut it, but still great. 


Jalapeno Chicken

Ott, A and I had so much fun during Canning Week, we decided to share some recipes using items we canned! Make sure to stop by her blog and check out what she's been cooking!


If you grow jalapenos, you know that you can quickly find yourself with an abundance. What did you do with all of those? I chose to pickle several jars. I use them throughout the year in various dishes such as chili and taco casserole. In each case, I find that I'm only using a small amount, so I canned most of my pickled jalapenos in small jelly jars. For this recipe, it's the perfect amount!

What you'll need:
Boneless, skinless chicken breasts (for this recipe, I used 3)
small jar of pickled jalapenos

Place chicken breasts in dish, along with entire contents of jar.


Cover and marinate 4-6 hours. 

When you're ready to start cooking, preheat oven to 350. Take all of the jalapenos and juices and put those into a large skillet. 

Saute lightly. Sear each side of the chicken breasts in the same pan, then place chicken back in baking dish. 


Cover chicken with foil tightly and bake 35-45 minutes, depending on how many chicken breasts you are fixing.
To go with the chicken, I fixed Spanish Rice. I cheated...I used Zataran's box mix. But, I saved some of those jalapenos that I sauteed and mixed those in with the rice.

When the chicken is done, top with a thin slice of cheese and a spoonful of salsa....and don't forget one of the sauteed jalapenos!


Sunday, September 19, 2010

Halloween Decorations

Well, it's been a while since I've posted regularly, but I'm trying to get back at it. Today, I let the husband do the cooking, so I thought I'd post my Halloween decorations I've been working on. I'm either getting old, turning into my mother, or both.  I've been in decorating mode this fall. Over the weekend, I made these cute, multi purpose balls. I'll explain the multi purpose later.

I've read several blogs lately that show how to make these. I finally decided I wanted to give it a try. Here's what I purchased:

Twine (my husband doesn't do things half way, so I now have enough twine to get me through the next 35 years)
Balloons
Glue 
Spray Paint
Plastic halloween thingies


I spent $11, but that will get me through multiple projects...and all of my twine needs for the rest of my life. 

To begin, I blew up a balloon, then wrapped it with twine in crisscrossing patterns making sure not to leave any large gaps. 

In a small bowl, I mixed a 4 oz bottle of cheap school glue and about 2 tablespoons of water. Using a paintbrush, I applied the glue, generously, to the entire twine covered balloon. A lot of blogs that I read had all these complicated "glues" they used. I don't have tapioca starch is my pantry, but I did happen to have several bottles of glue from all the back to school sales. I figured I'd try with the glue and water and if it worked, great! If not, then I was only out a bottle of glue, one balloon, and a very small fraction of my endless twine spool. As it turns out, one bottle of school glue works just fine. Other blogs also suggest soaking the twine in the glue before wrapping it around the balloon. If I had help, I would do it that way. However, I'm very uncoordinated and was going at this solo, so I did it my way. 

The picture below shows round 2, where I experimented added food coloring to the glue, in place of spray painting it later. I'll let you know how that works out. To let it dry, I tied a piece of fishing line to the balloon and hung it by a hanger on a clothes rack outside. **This is a VERY messy project! I suggest doing all of it outside, or cover a table with newspaper or plastic. But really, do it outside!** Notice the green puddles below the balloon...the husband is going to kill me when he sees it!


In almost all of my tries, the balloon has popped itself. If it doesn't, pop the balloon and gently remove the balloon pieces from twine. The one time it didn't pop itself, I popped it with the tip of a pin and it immediately contracted from the glue with no change in the twine shape. When it has dried completely (usually overnight), paint with desired color. 

When paint has dried, add embellishments to globe. I used plastic Halloween decorations I picked up at Walgreens. 100 pieces for 99 cents. Many of them were rings, which I hooked through a couple pieces of twine and they are staying in place just fine. 


I opted not to permanently affix the decorations because I plan to reuse them throughout the year for various holidays. I already have some plastic pieces in mind for Christmas! I will probably make new ones at Easter and hot glue some ribbon around them to look like eggs. 

As if that wasn't cute (spooky?) enough for you to run out and make your own, I also added another touch...lights!

I picked up these flameless, color changing "candles" at the dollar store too. I know the package says $5, but they were only $1!!


I guess all these crafty blogs are getting to me, because I went to the dollar store and bought things to make a wreath. This is the very first wreath I have EVER had in my house. Also my first attempt at making one. The wreath below cost $4 to make!!!! Everything came from the dollar store. I have to admit, I kind of like it. OMG~I AM MY MOTHER


I'm thinking about doing a crafty blog hop for October. Would you be interested in participating? If I do it, I'll have a crafty giveaway, with items like ribbon, glue guns, beads, etc. Thoughts?

This post was linked to some of the parties shown here

Tuesday, September 14, 2010

Angel Food Surprise

Ott, A and I had such a great time during Canning Week, we just didn't want the fun to end! Every Tuesday, we'll be showcasing a recipe using things we canned this year. Make sure to check back each week for lots of great recipes from us and our fellow canners!


I've made this a few times, but until now, I never realized it didn't have a name. So I apologize for the lack of imagination here, but I'm tired; it's been a long day!!

Any time I make a dessert to take to work or somewhere else, the husband always gets this really sad look in his eyes because i won't let him touch it. This is one of the few desserts that I can make him his own little bowl  and avoid the puppy dog eyes. To start, I drain and rinse a jar of berries I canned earlier this summer. I canned them in some simple syrup and lemon juice. But there's plenty of sweetness in this dessert, so I rinse the syrup off and pour them in a bowl

If I'm in a hurry, or just being lazy, I'll buy an angel food cake. If I have the time, I make a cake. To make the process go a little faster, I split the batter up between a couple of loaf pans and a couple ramekins. Then bake until done. The ramekins are great because the husband gets his own little bowl and that's one less dish to wash! 

To make the individual desserts, run a knife around the edge of the ramekin and pull the cake out. 

Put a few berries in the bottom and set the cake back in the dish and poke a few holes in the top of the cake.

For the main dessert, tear up the big cakes into bite size pieces and put a layer of cake in the bottom of a 2 qt glass bowl. Then add a layer of berries. Repeat.


Prepare a large box of jello as directed on the box. Let it set in the refrigerator for about 30 minutes. 


When it starts to thicken, remove from refrigerator. Spoon about a ladle full into each small ramekin.


Pour the remaining jello into the large bowl


Let it set up in the refrigerator for about 2 hours. Top with whipped cream to serve!

The canned berries have so many uses. They're great as an ice cream topping or in pancakes. Of course you can always just eat them straight out of the jar! 

To make a great smoothie, combine the following ingredients in a blender:
(the amounts can be varied depending on how thick or thin you want it)

Canned berries
Plain Yogurt
1 or 2 large marshmallows
Milk


Do you have a great recipe you'd like to share? Link it up on my blog! No rules, just a fun way to share recipes.

This post was linked to some of the parties listed here.
Make sure you take a peek. I don't just do this to satisfy the hostesses; blog hopping is how you meet all kinds of wonderful bloggers and make new friends!

Speaking of wonderful bloggers, make sure to visit these blogs for other great recipes using things we canned over the summer!


Wednesday, September 8, 2010

Not Just Another Day

I like my job, some days better than others. Most of the time, it's ok. It's a paycheck, and in these tough times, that's more that many people have. Then there are days like today. I had a great time out in the field and learned a lot!

It started with the drive to Rensselaer.


Lots of windmills up and down I65


LOTS of windmills


Just to be clear here, I WAS NOT DRIVING!


We're getting closer...I see cornfields!


Now that we're here, everyone is checking their points


Then we spent some time in the corn fields


Did I mention the amount of time we spent in the corn fields?


Then we saw some random goats in a drainage ditch


Maybe I'm just a city girl, but I can honestly say that was the first time I've ever been driving along and look over to see goats right at the roadside!


Soon, the day is almost over...and we were getting to that deliriously tired state


"They call me S to the C, yo'
And that corn behind me makes your Fri-to"


Wait...What?

To be clear, she did NOT say that.


Oh, I almost forgot; we spent some time in the corn fields


And saw a few windmills on the way home


It's days like today when I go home and realize how lucky I am to be paid for this!